-
Tiny tunes app android
Tiny Tunes is a free music player and downloader app for Android devices. It allows you to search and download songs from the internet and create playlists to play your music. You can also stream music online and listen to radio stations. The app has a simple and easy-to-use interface, and it supports various audio formats such as MP3, WAV, and M4A. You can use Tiny Tunes to discover new music and artists, or to listen to your favorite songs on the go.
Where download tiny tunes app for android

You can download Tiny Tunes for Android from the Google Play Store. Here are the steps:
- Open the Google Play Store app on your Android device.
- In the search bar, type “Tiny Tunes” and press Enter.
- Select the app from the search results.
- Tap the “Install” button to begin the download process.
- Wait for the download and installation process to complete.
- Once the app is installed, you can launch it from the app drawer on your device.
- In your browser, download the TinyTunes .APK file here: TinyTunes 1.16.2 APK Download
Alternatively, you can also download the Tiny Tunes APK file from a third-party website and install it manually on your device. However, it’s important to be careful when downloading apps from external sources, as they may contain malware or other malicious software.
-
This neural network app will tell you how beautiful you are

This neural network app will tell you how beautiful you are. How to figure out which selfie photo to post on Instagram if you took 10-20 photos at the same time, but with different emotions and poses? In this case, the HowСuteAmI application will help. Based on neural networks, it is able to determine how beautiful you are..

The developer,used the Python language to train the neural network and a sample with labeled photographs of people, where their beauty is evaluated, it was collected at one of the universities in China. In total, there are not so many photographs in the sample – 5500 pieces. Of these, only 750 are Caucasoid faces, which is very few, but the application is already showing good results.
Based on a standard deviation of 0.64, the author of the material came to the conclusion that evaluators from a Chinese university almost always gave similar scores to different photos, which suggests that beauty is not individual and beauty parameters are approximately the same for all people, so you can approach this issue mathematically.
Next, he developed a neural network of 32 neurons that converts the feature vector of an image into a final score that describes the beauty of a person. He trained it on the basis of data from the University of China and got a working neuron. Alexander has developed a small HowСuteAmI Android application to quickly evaluate the application’s performance, and we have already tested it.
I would like to say right away that so far the application, at least in my case, does not work very well. The front camera of my device produces 10-20 megabytes of pictures, and the application crashes if I try to upload such a large photo, so I have to compress it.
What is the result? I tried some of my own images and photos of various people. The results are interesting, but not without questions. As for my photos, the application accurately rated them according to how I rated them myself, because a lot depends on the lighting and angle, and in this matter the application can accurately predict which photo from a selection of photos of one person will be the best . The maximum score that I managed to squeeze out is 7.5, on average my photos gain 5-7 points. At the same time, I don’t consider myself handsome, to be honest, and it’s very strange that, for example, Johnny Depp received such a low score, given that objectively he is a beautiful person.


The same goes for Angelina Jolie. Of course, she is beautiful, and I would give her 9-10 points, but the application thinks otherwise. Probably the reason is a small sample, 750 images of Caucasian faces are not enough for the application to accurately determine the beauty of a person.


It is still difficult to call the result final, but such a study says only one thing – the tastes of people in the world are similar, and it is possible that in the future, based on likes on photos, Facebook will be able to develop its own neural network and embed it in Instagram. In this case, before publishing, users can easily evaluate how successful the selfie turned out to be. And the quality of the assessment will be as objective as possible. It’s great when there are such applications and such developments. They make the world a better and, most importantly, more beautiful place.
It is interesting to know the opinion of our readers. How many points did you get?
Application: HowСuteAmI
Category: Entertainment
Version: 1.0.10
Price: Free
Download: Google Play
-
Before Launcher Review – Minimal Launcher for Android
Before Launcher Review – Minimal Launcher for Android. Standard launchers of modern smartphones are already tired of many . In addition, they are too overloaded and lead to an obvious dependence. I began to notice that I can no longer spend even 10 minutes without a gadget in my hands, and shell interfaces also play a significant role in this. Before Launcher should fix the situation because it offers a minimalistic interface that limits the user from unnecessary content.
By unnecessary content, I also mean notifications that distract the user from work. How to deal with this? Previously, Google introduced the “Digital Wellbeing” feature, which fixes the situation with dependence on specific applications, but does not affect the interaction directly with the phone interface. We can not use applications, but at the same time admire the wallpaper on the desktop. And this addiction has become the norm for many smartphone users.


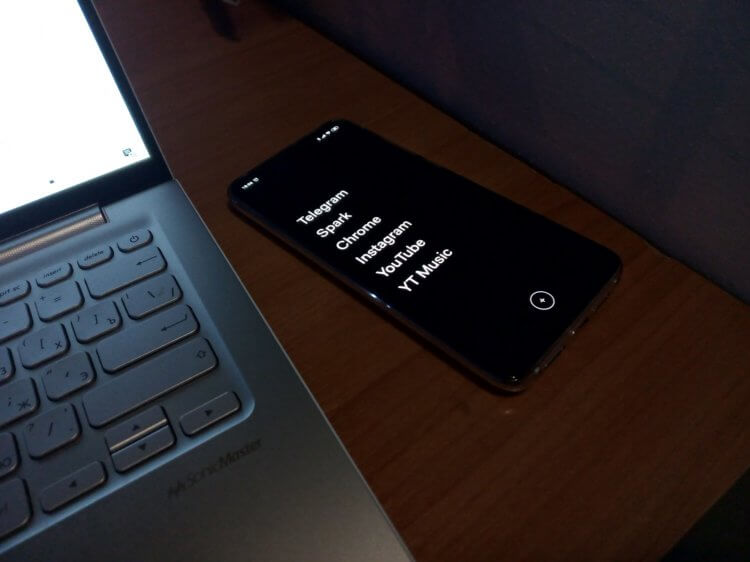
Before Laucnher offers a minimalistic interface divided into three areas. The central screen displays up to 8 main applications, if you swipe to the right, a window with important notifications will open, if you swipe to the left, you will see a list of all applications. Let’s look at each section separately.
On the main screen, as mentioned above, you can add up to 8 applications, they are displayed not as icons, but as inscriptions, so as not to distract the user and not provoke him. A variety of colors that differ from black and white provoke the user, so this decision looks correct and logical.
The button with a plus at the bottom opens a menu with applications, a circle is displayed next to each, by clicking on which the selected application will appear on the main screen and become the main one. You can also change the order of applications on the main screen, just drag the area with the name of the application and the drag-n-drop function is activated.
Now let’s move on to notifications. They are located in the left section. When you open it for the first time, the launcher offers to set up important applications, it is their notifications that will notify the user with sound and vibration, all the rest will only appear in this area and will not notify the user in any way. This is done in order not to distract a person from important matters with unnecessary sounds. However, for some reason, notifications do not work at all on my Xiaomi.


The menu with a list of all applications is located at the very right of the screen and displays recently used applications at the top in a separate list. There is a search button at the bottom.
In the launcher settings, you can go to system settings, activate notification filtering, enable the Do Not Disturb function, from here you can also select applications whose notifications will not be filtered. In the settings, you can also choose a background color, activate Incognito mode, clear the application usage history, and set a standard launcher. Anything more is not needed.
This, perhaps, is all the possibilities of this launcher. They are small, but that’s the beauty of Before Launcher. Owners of phones with AMOLED screens can activate a black background, in which case the battery consumption will be minimal, because the interface itself is minimalistic, and nothing is displayed here except text. In addition, I want to note that the application practically does not consume RAM. At least I didn’t notice the expense.
. The launcher seemed to me optimal in terms of getting minimal features from the phone. You will not be distracted by unnecessary notifications, you will not be disturbed by a colorful interface and juicy application icons. Everything is done in order to reduce the dependence on the smartphone, and in my opinion, the application does an excellent job with this.Application: Minimalist launcher for focus |
BeforeLauncherDeveloper:
Before LabsCategory:
Personalization Version: 2.6.7Price: FreeLink:
Download Application
-
Why are free VPNs dangerous?

Everyone has their own story about how they first met VPN. Many simply used it on an ongoing basis, while others did not even understand why it was needed at all. Nevertheless, a VPN allows you not only to hide on the network, but also to bypass many regional restrictions, and even save money. For example, many sites and services are simply not available in USA. You won’t be able to visit them without a VPN. Sometimes some services, for example, ticket sales, set different prices for residents of different countries. In this case, VPN allows you to pretend to be a resident of another country and get a lower price. And, of course, you should not forget about security, which is much higher when using a VPN, especially in networks provided in a public place. All this is a VPN, which is sometimes simply irreplaceable.
Content
- Which VPN to choose for a smartphone
- Cons of Free VPNs
- Dangerous smartphone VPNs
- How to choose a paid VPN
Which VPN to choose for a smartphone
First of all, you should understand that free cheese is only in a mousetrap and you can easily be deceived. Any major VPN service is a huge global network of servers and computing centers. All this costs a lot of money and, no matter how much we would like it, no one will pay this money for us, especially since one server costs about 200 – 500 dollars a month. As a result, the entire network runs into a cost of several hundred thousand dollars a month, and this does not include maintenance, developers, designers, application creators, and maintenance. The creators of the service will still earn and get their money, the question is, how?
In particular, they can steal your data that passes through them. It does not have to be the data of bank cards and payment applications. This is a scam and no one will deal with it. But analyzing your traffic and selling data to advertising services is easy. In addition, your contacts can be intercepted, which will also find how to use it.
Paid services in this regard are a completely different matter. They value their reputation, because by taking a fee from users, they will earn more than on the side. If the price is low, it’s easier to pay and get access to unlimited traffic at high speed.

Cons of Free VPNs
In addition to the security issues listed above that come with free VPN services, there are other reasons not to use them.
First of all, among such reasons it is worth mentioning the smaller number of servers compared to paid counterparts. This leads to slow and unstable operation, as well as the inability to select servers in some countries of the world that you may need. This is important, because we have become accustomed to stability lately and we have a reason .
In addition to advertisers, your data may also be shared with others. In some way they get on the exchange and the one who pays for them will get them. In many cases, you will not know about it, but you can understand that advertisers have received information about your queries if information starts to appear in the results based on your search queries.
In addition, free services very often bombard you with ads, without even giving you the opportunity to skip them. In combination with the low speed of work, this can lead to the fact that you will not wait for the desired page very soon.
And most of the free services work through China, which for many years has been recognized as the main “spitter” on the confidentiality of information. Not many people want to transfer their data there.

Something like this, your data is carried on the Web through a secure tunnel when using a VPN
Many free services do not disclose any information at all regarding their activities. Even the user agreement they have is more “for show”. Good services are sure to describe everything in detail and make sure to indicate that their policy is no logs, which ensures that no one saves your personal data.
Dangerous smartphone VPNs
Relatively recently, one of the largest free VPN providers, Hola, was exposed. It boasted over 50 million installs but sold its user activity to third parties. The sale used a third party service called Luminati. This proves once again that free VPNs are still dangerous in one way or another. You will not even be saved by the efforts of Android developers .
How to choose a paid VPN
From the above, we can conclude that the only disadvantage of a paid VPN is that you have to pay for it. Many will have to overcome themselves, but it’s worth it.
I used several similar services from different teams, but in the end I realized that for a small amount per month it is much easier to turn it on once and always be safe than to turn protection on and off every time.
Lately I’ve started using Surfshark ‘s VPN . This service not only fulfills its main function, but also offers many useful additional features. For example, automatic disconnection of the connection in case of disconnection from the VPN server and the ability to use not only physical, but also virtual points.
For added security, Surfshark can track malware, block ads, and is encrypted with 256-bit AES keys. For some streaming services, such as Netflix and Spotify, a stable connection is important, otherwise, if the VPN falls off, the broadcast will be interrupted. Surfshark has an auto-connect feature that will solve this problem without the user noticing.
The best part is that with a two-year subscription, this VPN only costs $1.99 per month. Even with the jumped rate, it’s cheaper than a Yandex Plus subscription, three liters of gasoline, three subway rides, shawarma, a couple of bottles of light or a cup of coffee in a good coffee shop.
Why am I doing all this? And to the fact that security and privacy, which we talk about so much, are not just at arm’s length from us, but even closer. For such money, it is definitely not a pity to try it. Moreover, there is a 30-day money-back guarantee.
If you’re serious about online privacy, you’re probably wondering which service to trust with your traffic and your data.
-
Top 5 weather apps for your phone

Top 5 weather apps for your phone. Last week there was news that Apple had bought the famous Dark Sky weather app. It all ended with the fact that she already drank it from Google Play and Android users cannot download it. Not everyone knew about this application, but it was very convenient and cross-platform. As a result, those who now want to download the weather app will be forced to look for something new. I don’t often use things like this, but I figured it out and picked up a good selection of the best weather apps from Google Play. Check if you have used them.
Content
- Where can I see the weather on my phone
- Weather apps for Android
2.1. Weather app
2.2. Gismeteo App
2.3. Today Weather App
2.4. Accuweather app - Can the weather forecast be trusted?
Where can I see the weather on my phone
In order not to get caught in the rain, having a smartphone, you just need to look at the weather on it. There are four main ways to do this.
Many manufacturers preinstall their own or partner weather apps so you don’t have to look for them. If your smartphone does not have this, you can try looking for a widget. Very often it is added directly to the main screen and combined with the time widget. If you need more detailed information, click on the part where the temperature is displayed. The application will expand to full screen and you can see the forecast for several days and a detailed layout for the next few hours.
The third way is to use a browser. This is inconvenient, but may be suitable for a one-time request. If you follow the weather often, it is better to install a separate application. Moreover, even without Dark Sky , the choice is now very good.
Weather apps for Android
You can find the application you are interested in on Google Play, but I will save you from this and offer my selection. After I found these applications, I decided that I would definitely keep one of them. So far I can’t decide which one. Can you advise?
Weather app
The first application immediately turned out to be one of the best. It has everything! Weather forecast by day, weather forecast by hour, humidity, pressure and even a radar that will show where it’s raining right now and whether this rain can hook you.
The only negative of the application, and then relative, will be that it is with ads. But this is more of a general problem with third-party apps. We must pay tribute that in this case, advertising is very unobtrusive and almost does not bother. Sometimes it pops up in full screen, but usually it just hangs in the menu. And that is not often.
Gismeteo App
No less famous and even a household name is Gismeteo. At one time, I liked this service because it was possible to watch a long-term forecast in it. Not only is it not clear how long-term weather forecasts are made , but their accuracy leaves only hope that it will come true. But at least he was and it was nice.
Pressure, precipitation, wind speed, humidity… Everything is there – even the geomagnetic environment. The design is very pleasant and minimalistic, it’s a pity there is no radar. You can watch the weather only by numbers. If you don’t use something, you can turn it off. If, on the contrary, you need more information than a detailed forecast for the week, you will need to go to the site. The application has a special button for this.
Separately, I was pleased that I never encountered advertising. There are no small banners or pop-up windows. This is very endearing.
Today Weather App
This application differs from the previous ones in that it has a shareware distribution model. It can be used completely free of charge, like some other things , but some functions will not be available (for example, some types of radar). And on the main page there will be an advertising banner. A subscription can be issued for 4$ for six months, for 6$ for a year or for 8$ forever. The subscription includes disabling ads and unlocking all features.
Other than that, it’s just a good app, just like the previous ones. It has everything you need, and the interface has many settings that allow you to choose what you need.
Accuweather app
This app is probably my least favorite. Firstly, the interface resembles something between regional television and an accounting program. Also, ads are almost always visible on the screen.
I included it in the rating because many people praise the accuracy of the data of this application, and it also has a news section. Maybe someone will be useful. On the other hand, if you need something more than just the weather, it’s better to install Yandex’s proprietary application, which has weather, news, and caller ID to fight spam. Although, he also has his flaws.
Can the weather forecast be trusted?
Weather forecasts are based on a large amount of research and collected data. To do this, meteorologists have ground, air, sea and even underground sensors. All of this is brought together and processed jointly by the largest weather centers in the world. One of them is in Moscow.
Then the data is summarized and provided to consumers of this information as quickly as possible. Sometimes they differ, but this is often due to different interpretations. If you are interested in how weather forecasts are prepared and who does it , you can read my long material on this topic.
-
How to share Wi-Fi password via QR code

How to share Wi-Fi password via QR code. When you go to a place, you ask what the Wi-Fi password is. This is especially true when we find ourselves abroad, where there is no unlimited mobile traffic, to which we are all so accustomed. The same situation occurs if someone comes to visit us and asks for the password from the home Wi-Fi network. There is a very simple way to share even the longest password without having to write it on a piece of paper, enter it on a guest’s smartphone or dictate in the format “es as a dollar and with a dot, ve as a tick …”. The creators of Android have long taken care of us and made it convenient for us. They just forgot to tell us about it. But I will fill this gap and tell everything for them.
Content
- How to share a password via a QR code
- How to scan a QR code with a phone
- How to share a password on iOS
- Is it dangerous to use QR codes?
How to share a password via a QR code
The easiest way to share anything now is through a QR code. Many countries are even building their economies around it. For example, I told how in China a lot is tied to these small squares . It turns out that they can carry a lot of information, unlike the barcodes that we used before. Now they are relevant only for encrypting a small amount of information. For example, the item number in a supermarket. After all, the cashier receives the article by scanning these stripes before punching the goods.
QR-code translated from English means “quick response code” (Quick Response Code). ”QR code” is a trademark of a type of matrix barcode that was originally developed for the Japanese automotive industry and used in factories to sort parts.
To share a Wi-Fi password on Android , you just need to go to the network settings, select the network you are connected to and click on it. After that, you will see a QR code on the screen with the data necessary to connect to this particular network. This method works on smartphones Huawei, Honor and many others. However, sometimes the algorithm will be slightly different.
So you can share Wi-Fi via QR.
For example, on Google Pixel 2XL with Android 10, the QR code does not appear immediately. Instead, an additional menu opens in which you need to click share. Only after that, a QR code will appear on the screen, which must be scanned.
Scanning the code is possible both from an Android smartphone and from an iPhone . At the same time, iOS already from the 11th version (since 2017) allows you to scan QR codes through the standard camera application. You just need to start the camera and point it at the treasured square. A curtain will pop up at the top of the screen, by clicking on which you can go to the page or accept a connection request.
How to scan a QR code with a phone
Unlike modern Apple devices, not all Android smartphones have the ability to scan a QR code out of the box. Someone gives the user a scanner in the form of a pre-installed application, and someone in the form of advanced camera features. But very often the QR scanning application needs to be downloaded separately.
Of course, the easiest way to do this is through Google Play. It is enough just to enter in the search “QR scanner” and choose any of the suggested ones.
Some scanners allow you to save a scan history or have additional features, such as the ability to create your own codes or scan product codes in stores.
How to share a password on iOS
Since we have already talked about how you can share a password, let’s tell you how to do it on iOS.
Apple’s device infrastructure has some very handy features. One of them is the ability to effortlessly share the password from the Wi-Fi network. To do this, you need to have an access point connection on your iPhone or iPad.
If someone comes to you who has not connected to this network, you just need to unlock the smartphone , and the guest select your network and start connecting to it. As soon as he touches her name in the list, you will be prompted to share the password. Sometimes this message may appear within 4-5 seconds, but usually it happens immediately.
Sharing a password is possible since iOS 11
After a couple of seconds, the guest will be connected to your network and will be able to use it.
Is it dangerous to use QR codes?
There is only one danger in using QR codes. I do not advise you to scan everything if you do not have confidence in it. For example, a code on the air of a major TV channel or on a movie poster will be safe and is usually purely informational. That is, you will be taken to the site page or to the app store for downloading.
QR codes in leaflets on poles or bus stops can lead to malicious sites or even try to install some software on your smartphone. Such codes are best avoided.
If you use QR codes carefully, this will be an undoubted boon. It is very convenient and simple. It is not for nothing that very large payment systems are built on them in China. That is, in the store it is enough to scan the code and the payment will go through. The Chinese know what they are doing.
-
What apps do I use to get things done?

What apps do I use to get things done? In my work, I often have to use various task schedulers. It is very convenient. Especially when you have several projects and you need to remember what needs to be done on that particular day. Otherwise, it will turn out to be something that literally everyone has encountered, but they really don’t want to repeat it. Customers are dissatisfied, the boss yells, the pulse jumps, and a sleepless night at the computer looms ahead. And okay, if you missed the deadlines for something local, but sometimes other employees also suffer from this. But not only for work, task schedulers are useful. In everyday life, they can also be very useful. Therefore, today I will tell you which planners I use and which ones I am ready to recommend personally. And at the same time I will give a couple more examples of such applications.
Content
- Android to-do planner
- How to plan things for the day
- To-do planner with notifications
- How to ask an assistant to create a reminder?
- Free planners for android
Android to-do planner
There are at least two dozen task scheduling programs on Google Play and AppStore. Good of them will be at most half, and those that you want to use, a maximum of 2-3. Another important factor in the comfort of use is the ability to synchronize tasks between devices and simply store a backup copy on the server. After all, the tasks in the list are usually not limited to one day. Personally, I have everything planned out for several months in advance and the loss of all this for me would be a disaster.
How to plan things for the day
However, I also have an application that allows you to plan things for the day. Well, or just collect what needs to be done without reference to specific dates. It’s called Clear Todos and it’s available for both Android and iOS. True, on Android, a banner sometimes pops up in it. For iOS it is completely free.
I use it to, for example, on the way to work, throw in a few tasks that need to be done first, but they are all small. Or in order to break a larger project into subtasks, gradually crossing them out as they are completed.
Minimalism is always inviting.
The application interface is as simple as possible, consists only of cards and is controlled by gestures . To make it easier to imagine, you can draw a parallel with the levels. On the top are the to-do lists, and on the bottom are the to-dos. Between them, you can just move with swipes.
Cards can be swapped, and as they are executed, deleted by swiping them to the side. Everything is very simple. I advise this application to those who do not plan something far in advance, but simply make plans for the weekend or think about how to distribute things in the next few hours.
Download Clear Todos from Google Play
To-do planner with notifications
Another option that I use on a regular basis is Todoist. In our editorial office, this is generally the main working tool, after the site admin panel and the “Telegram” messenger. In it, we communicate with authors who, without exaggeration, are scattered all over the world.
A nice feature of this particular scheduler is that it can be used for a team. That is, we can set tasks within the framework of the created projects and understand who should do something and by what time. Based on this, we can build our plans and do the work more efficiently.
Todoist even has a dark theme.
In addition to common projects in the same application, you can create your own lists or simply throw things into your inbox. If you move on to the tasks for the day or plans for the week, then the whole picture of the upcoming tasks becomes very clear. If something is not done, then it is marked in red and moves up as something that is overdue and must be done first. If plans have changed, you can easily drag the task to another day.
And the ability to add a description for tasks helps in the work. There you can put individual notes or links to materials that you may need.
There is a paid part that will provide additional features, such as SMS reminders, but all the features that will be enough for daily use are free.
Download Todoist from Google Play
How to ask an assistant to create a reminder?
Sometimes I use stock Android and iOS reminders as I have devices on both platforms. First of all, it is convenient when you need to quickly set a reminder. Just asked an assistant and the reminder is ready.
To do this, you need to launch it by voice or in other ways and ask “Remind me …” or “Set a reminder …”. After that, dictate what and when to remind. Ready!
True, this approach has its downsides. First of all, they lie in the fact that the assistant may misunderstand you. Okay, if he just writes “she” instead of “he” or something like that. But sometimes reminders are created in such a way that it is simply impossible to understand something. Especially if you made it on the run and set it a few days ahead. Then you try to understand what you mean.
Therefore, even if you set a reminder by voice, it is better to see what the assistant wrote down there. If nonsense is written, it is better to correct it immediately.
Free planners for android
Another good to-do app is the famous Wunderlist, but I stopped using it. Somehow it just so happened that I decided to try Todoist, and then the whole editorial office switched to it and the bridges were burned. Now it is no longer supported , but somehow you can use it. However, I don’t see the point in that.
The functionality is not very rich, but some people need it.
If you often use MS Outlook, pay attention to the Microsoft To-Do application. All in all, it’s not a bad, but not very efficient scheduler. But integration with an email client can be very useful. In addition, basic functions, such as creating lists and setting complex tasks, are in place.
Download MS To-Do from Google Play
Other interesting apps can be found on Google Play , but I have tried many of them and wrote this article based on personal experience.
-
How to use whatsapp on computer.

How to use whatsapp on computer. We are often asked how to run WhatsApp on a tablet or computer. This feature is really very useful, but for some reason WhatsApp has not yet implemented such functionality of its messenger. Let me remind you, the most popular in the world! Perhaps the developers are already happy with everything, or it’s just their life position, but this is not normal. I would love to use WhatsApp if I was given cross-platform and the ability to conveniently send files. Actually, what Telegram had almost from the very beginning. Well, okay, this is a lyrical digression. Today I will tell you how you can still run WhatsApp on any computer. There is nothing complicated about this, but not everyone knows about it.
Content
1. What are the advantages of chatting in WhatsApp
2. How to install whatsapp for computer
3. Is it possible to download WhatsApp on a computer
4. How to send a file via WhatsApp on a computer
5. Is it possible to use WhatsApp on multiple devicesWhat are the advantages of chatting in WhatsApp
Many people love WhatsApp for its simplicity. Somehow everything in it is simple and user-friendly. There are no complications with groups, channels, sending files and stickers. A pure Kalashnikov assault rifle – just install and use.
However, why can’t this functionality be transferred to a computer? Just write applications for MacOS and Windows and that’s it. People will say thank you and will use this messenger with even greater pleasure. And if you make applications for tablets, then there will be no price for you guys.
Instead, the developers and executives of WhatsApp know themselves that they crumple and do not release a full-fledged client for anything other than smartphones. How can you get around this flaw?
How to install whatsapp for computer
First of all, you need to understand that you do not have to install anything on your computer. The only exception will be the computer from which you have never accessed the Internet and which does not have a browser installed. For this computer, you will only need to install any browser.
The essence of WhatsApp on a computer lies precisely in the WEB version of the messenger . You open https://web.whatsapp.com and you will be prompted to scan a QR code. Next, you need to launch the WhatsApp application on your phone and click on the three dots in the upper right corner.
This is how WhatsApp Web is configured on Android.
In the drop-down menu, select the WhatsApp Web item and then scan the QR code ( we have already talked about the benefits of these codes and their history ) from the computer screen. The connection will be established almost instantly.
If you have an iPhone, you will need to go to the application settings, select “WhatsApp Web” there and then scan the QR code from the computer screen in the same way.
This is how WhatsApp Web is configured on the iPhone.
Previously, this feature only worked when you were on the same Wi-Fi network. Now, in most cases, you can use this method, even if the smartphone is connected via a cellular network, and the computer via a fixed Wi-Fi.
The only good thing about the web version of WhatsApp is that it will warn you if your smartphone is running out of battery. There are no more advantages in this complicated method, and it is much easier to launch applications like Telegram and use the messenger calmly.
However, I have come a long way. Whatsapp has an app, but it’s more like some kind of mockery.
Is it possible to download WhatsApp on a computer
You can download WhatsApp for any computer as a separate application from the official website WhatsApp.com. But only after downloading and installing you will immediately receive a painfully familiar warning.
Scanned the code and you can use it.
You will once again be told how to scan a QR code through an application on a smartphone. Personally, I think that this is some kind of mockery. Okay, the browser version works with such a scan, but why can’t you change something and make a normal application, I can’t understand.
Even if you can’t do that, why write an app then? You can safely use the web version.
On the WhatsApp website you can download applications for all devices.
How to send a file via WhatsApp on a computer
You are not limited to just the text in your messages that you send via WhatsApp on your computer. You can also send files. To do this, click on the paperclip icon in the upper right corner of the chat and you can choose between different types of attachments. The Photos & Videos icon lets you add files you’ve already saved to your hard drive, but you can also use the camera button to take new shots. You also have the option to send documents (any other file type).
Is it possible to use WhatsApp on multiple devices
You can use WhatsApp on multiple devices , but only if one of them is a smartphone and the second is a connected computer . In other cases, if you log in on several computers, with each new attempt to log in, your old device will “fall off”. You can only run WhatsApp on one computer.
While trying to do this on the second computer that was authorized in the service, you will receive a notification that the session needs to be intercepted. As soon as you click the corresponding button, it will be completed on the other computer.
Perhaps this is for security reasons so that no one else can use your account , but it seems to me that a more effective method of fighting privacy can be found. And at the same time, make sure that people feel comfortable using this, generally good, messenger.
Let’s do a little poll. Answer in the special form below, whichever you prefer to use. I will not specifically include the “several” option, since we all use more than one messenger. Just choose the one you like best or use the most.
-
Okay Google! Leave me alone! How to turn off the voice assistant?

Okay Google! I sincerely respect the voice assistant from Google. Siri, the Google Assistant is no match. And by a combination of factors, he is probably the best voice assistant of its kind. The problem is that sometimes it is completely unnecessary and it is much easier to turn it off than to continue using it. Often, because of this, he even begins to annoy, and if this has begun, then you pay more and more attention to him. In short, a vicious circle. At the same time, not everyone knows how to turn it off, and therefore they often ask about it. In this article, I will answer all at once.
Content
- Google Assistant Features
- How to disable Google Assistant
2.1. Simple deactivation of the Google Assistant
2.2. How to disable the call assistant button
2.3. Uninstall Google Updates
Google Assistant Features
I agree that the Google Assistant can be very useful and has evolved a lot since it first appeared on our phones. But what if he keeps coming out with his advice even when you don’t need him at all, or you just don’t want your phone to always listen to you? Everything is very simple – you need to disable unnecessary functions and life will become as simple as before.
The most annoying thing about the Google Assistant is when it just pops out at the moment when you don’t expect it at all, and the call was made by mistake. Sometimes this happens when unlocking a smartphone. This happens if you accidentally hold down the Power button a little longer.
As a result, you must first close it and only then perform all the necessary actions. Of course, we are talking about seconds and you should not think that this is a very long and complicated process. The fact is that we are accustomed to the maximum responsiveness of the interface and to the fact that even on inexpensive smartphones everything works very quickly and does not make us waste even extra fractions of a second.
It’s like YouTube. Not so long ago, studies were conducted that showed that if the video does not start within three seconds, users begin to get nervous, and if 6 seconds have passed, then the video is closed. Although, it would seem, only 6 seconds.
After opening, the assistant captures your voice, analyzes it and performs the action you specified. You can even carry your smartphone in your pocket and accidentally activate the Google Assistant. I had this too. It is especially disgusting when you are talking to someone or some kind of video is playing in the background. In this case, the assistant snatches a piece of the conversation and tries to answer it as a request.
How to disable Google Assistant
If something of what I described above or the like happened to you in everyday life and you are tired of the Google Assistant, you should just turn it off and there are three options for this.
Simple deactivation of the Google Assistant
If you decide to turn off the Google Assistant completely, follow these steps: Open the Google app and select Menu (three dots), then go to “Settings”. In the Google Assistant section, select “Assistant”. At the bottom of the list, select ”Phone” and disable the option “Google Assistant”
How to disable the call assistant button
In most cases, disabling the Google Assistant button will be enough. Thus, you will no longer be able to access the assistant when you press the Power button. So you can get rid of those very random calls.
Go to Settings and select ‘Apps’, then open’ Default Apps ‘and then click on ‘Assistant App’. Here you can change various settings, including turning off the call to the Google Assistant with the Power button. Just select “No” in the “Assistant” section.
This option is the most optimal, as it does not disable the Assistant completely and allows you to continue using it if necessary. But you will never call it by accident.
Uninstall Google Updates
Since we are talking about all the options, then let’s continue to the last and really go through all the possibilities. The last of these will be the removal of Google updates. That’s another idea, but why not do it if you want to be different from everyone else?
The Google Assistant is a relatively new development; earlier versions of Google Assistant did not exist. Accordingly, if you roll back to the same version, then nothing will happen and we will get a version without the Assistant. True, in this case, other updates will be lost.
To implement this action, go to “Settings”, then “Applications” and then select “Task Manager”. After that, select the Google application from the list and go to it.
Inside, you will need to click on the three dots in the upper right corner and select the option “Uninstall updates”. After that, the version of the application will return to the original.
-
4 of my favorite document and photo scanners for Android

4 of my favorite document and photo scanners for Android. Previously, in order to scan documents or photos, you had to buy a separate box that could only scan. The rest of the time, she simply took a place somewhere in the corner or even interfered “on the aisle”. Then they became much thinner, but it was still a separate device. Over time, they migrated to the composition of multifunctional devices (MFPs) and were already in the same case with the printer. But now the time has come when they can be in a smartphone. I have an MFP, but I only recently tried to scan a document there and realized that I was doing the right thing when I used it only as a printer. I keep scanning documents with my phone and this is what I use.
I will immediately note that the above applications do not claim absolute leadership in all categories. This is a presto list of what I have ever used and was generally satisfied with. That is, I can recommend these applications and, most likely, you will like them.
If you have something to add and want to share it, leave your options in the comments. Only without links, so that our strict spam filter does not wrap your comments. Just indicate the name and the main pluses. Who needs it, they will find it on Google Play. Knowing the name, this is not difficult. And if you want to discuss these and other applications, visit.
Content
- How to scan photos from a smartphone
- Office Lens – document scanner from Microsoft
- FineScanner AI – text recognition scanner
- Clear Scanner – regular scanner
How to scan photos from a smartphone
For scanning just photos from a smartphone, I did not find anything better than the application from Google, which is called “Photo Scanner by Google Photos”. Its main advantage is the maximum simplicity and the ability to scan photos without the need to select lighting.
The problem with many smartphone scanners is that you need to stand up so that no shadow falls on the document or photo. Otherwise, the scan will look like this.
Google’s scanner offers to take several photos from different angles and glues them together. This removes unwanted glare, wrinkling and some other defects.
Ready photos can be viewed in the application or in the photo album. They can also be cropped and sent via instant messengers or to cloud storage.
The only drawback of the application, which I found for myself, is the heating of the smartphone case. This happens while the application is running and is most likely due to the fact that the processor has a large computational load on processing and gluing applications.
Office Lens – document scanner from Microsoft
The company that gave the world (for a modest fee) Windows also made its mark with its Android scanner. It’s called Office Lens. There is nothing superfluous in it and this minimalism attracts.
When you first start you will be shown a small instruction and you can start using it. The main interface of the application is similar to a simple smartphone camera. There are several shooting options: whiteboard, document, business card, photo. The first option is very convenient when you need to take a picture of the contents of the board at a meeting or in class. The final image will differ from a simple photo in that even if you sit on the side, the picture will eventually be even. The necessary distortions will be compensated automatically.
After the scan is completed, you can select the file name, save type and send it to other users.
FineScanner AI – text recognition scanner
I like this scanner a little less than the others listed in the article, but it has one useful feature that makes it stand out from the rest. I’m talking about text recognition from a scanned image. True, you will have to pay for this function by subscription, but the rest of the scanner’s features can be used at no additional cost – that is, for free.
In general, everything is standard, except that automatic border detection is immediately placed on the main screen. Then everything is as usual. We take a photo and proceed to the design, where you can choose what to do next with the photo.
It can be renamed, saved and sent to someone, and for any of these actions, select the desired file format.
Clear Scanner – regular scanner
The latest scanner for today is not something outstanding and got into the article only because I used it for some time and in general it did not let me down.
It does not have outstanding features, except for the convenient precise positioning of the corners of the image when cropping. And all the scanners above are launched and immediately show the workspace, and this one first suggests choosing where to take the image from. You can choose from a camera and an album. However, processing photos of documents from the album is not a killer feature of this scanner.
Which scanner to use is up to you. Of course, sometimes it is convenient to use an MFP. For example, when it works in an office or home network and the image can be received on the phone . In other cases, for quick sending, it is much easier to use the camera of a mobile device. Especially outside the home or office.TAGS
-
6 Cool Android Widgets You Should Try

6 Cool Android Widgets You Should Try. It is always a big problem to find a good and interesting smart phone widget. Because of this, many do not take advantage of the very nice Android feature that allows you to place widgets on your desktop. They can be arranged in different ways and so to ensure that the interface becomes even more convenient. I’ve gone without widgets for a long time, but lately I’ve started using some and picked up a few options that I like. I know that my opinion is shared by many and I am ready to share the list so that everyone can try to find something for themselves and make the interface of their smartphone even more interesting.
Content
#Widgets for Android
1.1 KWGT Kustom Widget Maker – Universal Widget
1.2 Overdrop – weather widget for Android
1.3 Data Counter Widget — Data counter widget
1.4 Musicolet – music widget
1.5 Calendar Widget – calendar widget
1.6 Sectograph – an unusual calendar widgetWidgets for Android
Indeed, the interface of a modern smartphone is good and allows you to get quick access to applications. However, sometimes access to them is not needed if they are started initially. Many applications allow you to bring to the desktop small dice, often of arbitrary size, which display the most important information from the application. For example, it makes no sense to open the weather application if the information from it can be placed on such a small rectangle and you can see it every time you turn on your smartphone.
Your smartphone already has widgets. In order to bring them to the desktop, you just need to touch in the place where there are no application shortcuts and hold your finger a little. Select Widgets from the dropdown menu. Then you can get acquainted with the list of what is available, touch it for a while and bring it to the desktop. Everything is simple.
KWGT Kustom Widget Maker – Universal Widget
If you consider yourself an advanced widget user, then KWGT is what you need. With it, you can create your own personalized widgets with a simple editor.

Some features require paid access, but a lot of things will be free. As a result, you will be able to assemble a widget that will contain a clock, maps, a battery indicator, memory, a music player and much more. Here is such a widget combine.
Overdrop – weather widget for Android
Weather widgets are as convenient as possible and this is what you should start with if you follow its condition and it is important for you what will happen tomorrow. In general, there are a lot of weather widgets on Google Play , but it is Overdrop that looks the friendliest. It is informative, elegantly designed and understandable.

It will simply be displayed on your desktop and you will not run the application. The weather will be before your eyes every time you unlock your smartphone. Again, there are paid features, but a lot is available even for free.
Data Counter Widget — Data counter widget
Another piece of system information that is always handy to have before gassing is the amount of data your phone is consuming. The Data Counter widget can separately display information on the cellular network and on Wi-Fi.
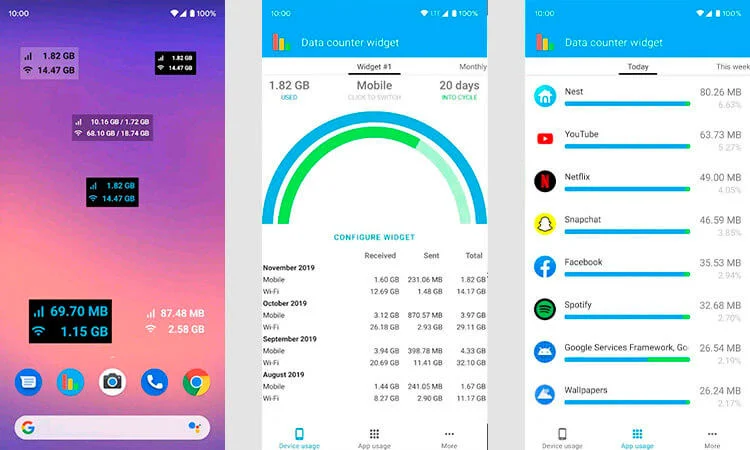
The text size, color and background can be changed, and clicking on the widget will give you more details (including a breakdown of which of your apps is using the most data).
Musicolet – music widget
Believe it or not, managing music is also much easier through the widget. As a rule, it is enough just to play the next song or press pause. The widget will do just fine with this.

Of course, you can use other methods of control. For example, displaying controls in the curtain, but the widget is much nicer. True, the fattest minus of the widget is that it only works with music that is stored on the smartphone. It does not support streaming.
Calendar Widget – calendar widget
Google Calendar has its own widget, but the Calendar Widget looks more interesting. Its design can be very finely tunedand it does not overload the home screen, as other calendar widgets sometimes do.

With the right combination of text, accent colors, and widget size, you can put together something that fits perfectly into the dedicated area of your home screen.
Sectograph – an unusual calendar widget
Sectograph is another calendar widget, but it’s not as banal as the others. Others may be nice and clear, but none of them represent your day by breaking it into sectors.

For clarity, the sectors are placed in a circle and show all your affairs for 24 hours. This way you can see at a glance what you should be doing right now and what’s ahead of you – this is a great example of a really informative widget.

